The Island Grille & Raw Bar is to Tierra Verde what salt is to pepper, meatballs to spaghetti, and so on. It’s a staple restaurant for many island residents and locals and I’m certain that it gets its fair share of beach traffic, especially from those who have spent the day at Fort De Soto. It’s actually the perfect spot … Continue Reading
Read moreST. PETE FOODIES APPROVED SPONSOR:

ST. PETE FOODIES APPROVED SPONSOR:

Recent Posts
 July 10, 2026
Sea Worthy Fish + Bar Continues to Shine with Pristine Seafood and Chef Jason Ruhe’s Passion for the Catch
July 10, 2026
Sea Worthy Fish + Bar Continues to Shine with Pristine Seafood and Chef Jason Ruhe’s Passion for the Catch
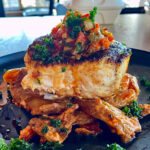
Some chefs build their menus around what distributors have available. Chef Jason Ruhe builds his around what comes off the boats. That philosophy has been at the heart of Sea Worthy Fish + Bar since Jason and his wife, Hope Montgomery, opened the Tierra Verde restaurant after the success of Brick & Mortar in downtown St. Petersburg. More recently, they expanded again with Pulpo Kitchen + Lounge in the Grand Central District, but Sea Worthy remains the restaurant that best showcases Jason’s passion for impeccably fresh seafood. Spend a few minutes talking with Jason and you quickly realize that this isn’t marketing copy – it’s simply how he lives. He does a lot of fishing himself, works closely with local fishermen and trusted fishmongers, and starts with whole fish that are broken down in-house every day. Almost every fish served at Sea Worthy was swimming earlier that same day. That’s a level of freshness that’s difficult to match, and it gives Jason the flexibility to feature species that rarely make it onto restaurant menus. One such fish was a beautiful Rainbow Runner that Jason proudly showed us before it was transformed into one of the evening’s standout dishes. It’s not a fish you’re likely to encounter at other restaurants around the Tampa Bay area, and that’s exactly the kind of surprise that makes dining at Sea Worthy so much fun. We began with cocktails, including a Jalapeño Watermelon Margarita that wasn’t even on the menu. We asked if the bar could make one anyway, and the request was met with a cheerful “absolutely.” It was refreshing with just enough jalapeño to provide a gentle warmth without overpowering the watermelon. We also enjoyed the Golden Hour, a bright combination of New Amsterdam Gin, Aperol, pineapple juice, fresh lime juice, Angostura bitters, and egg white that was balanced, silky, and perfect for a warm Florida evening. The If It Ain’t Broke Margarita reminded us why classics never go out of style. Made with Corazon Silver Tequila, fresh lime juice, and agave, it was clean, crisp, and expertly executed. The Roasted Beet & Goat Cheese Salad was both colorful and satisfying. There’s nothing like the earthiness of fresh beets. They paired beautifully with creamy goat cheese, while grapefruit added bright citrus notes that kept everything lively. Candied pecans contributed a welcome crunch, and the honey beet dressing tied the ingredients together without overwhelming the freshness of the seasonal greens. A drizzle of basil oil added another layer of flavor and visual appeal. Salads often go overlooked. Don’t make that mistake here. The Seasonal Burrata with Compressed Watermelon was another excellent starter. Creamy burrata is always a favorite, but the compressed watermelon elevated the dish with its concentrated sweetness and firmer texture. Pickled fennel and asparagus added acidity and crunch, while the balsamic reduction and basil oil brought everything into balance. Fresh mint completed a dish that tasted every bit as vibrant as it looked. The Tenderloin Tostadas proved that Sea Worthy is more than just a seafood destination. Crispy corn tortillas supported tender marinated beef, roasted tomatillo salsa, avocado, chipotle aioli, and pickled red onion. Every bite delivered contrasting textures along with smoky, creamy, tangy, and savory flavors. The Seared Octopus was beautifully prepared, achieving that elusive texture that’s tender without the slightest hint of rubberiness. It rested atop a hearty cassoulet of white beans, chorizo, and braised kale that contributed smoky richness while allowing the octopus to remain the star of the plate. Then came the dish that perfectly captures what Sea Worthy is all about. The Rainbow Runner Crudo showcased fish so fresh that very few restaurants could hope to duplicate the experience. The delicate fish was dressed with coconut and lime, accompanied by a green pepper and tomatillo purée, avocado, toasted pistachios, saffron oil, basil oil, and salsa matcha. The result was bright, refreshing, layered, and endlessly interesting, with each component contributing something different without masking the clean flavor of the fish. It’s the kind of dish you remember long after dinner is over. For entrées, the Steamed Maine Lobster Tail & House Made Pasta featured wide ribbons of fresh pappardelle tossed in a turmeric cream sauce with shallots, white wine, fresh herbs, and chorizo. The lobster was perfectly cooked, while the chorizo contributed subtle spice that prevented the rich cream sauce from becoming too heavy. Toasted baguette made sure none of the sauce went to waste. The Seared Chili Lime Pork Chop once again demonstrated that Jason’s talents extend well beyond seafood. The generously sized bone-in chop was served with smashed fingerling potatoes, braised chard, and an ancho chili demi-glace that added depth without overwhelming the pork. The Black Grouper was another standout. Blackened to develop a wonderful smoky crust while remaining moist and flaky inside, it was accompanied by smashed fingerlings, crispy fried kale, and a vibrant red pepper chimichurri that complemented rather than competed with the fish. This is another one that was just swimming in the waters right outside the restaurant. Dessert provided a fitting conclusion to the meal. The Bread Pudding was everything you hope for—soft, rich, soaked with flavor, and delightfully chewy in all the right places. The Key Lime Pie offered the bright citrus finish that every Florida meal deserves. Sea Worthy has matured into exactly the kind of neighborhood restaurant every waterfront community hopes for. It’s casual enough for a spontaneous dinner after a day on the water, yet the level of cooking consistently exceeds expectations. Jason Ruhe’s commitment to sourcing exceptional seafood, breaking down whole fish in-house, and allowing the day’s catch to shape the menu results in a dining experience that’s difficult to duplicate. If you’ve only visited Brick & Mortar or Pulpo Kitchen + Lounge, Sea Worthy deserves a place on your list. And if it’s been a while since your last visit, it’s worth returning. With seafood this fresh and a menu that evolves with the catch, no two visits are ever quite the same.
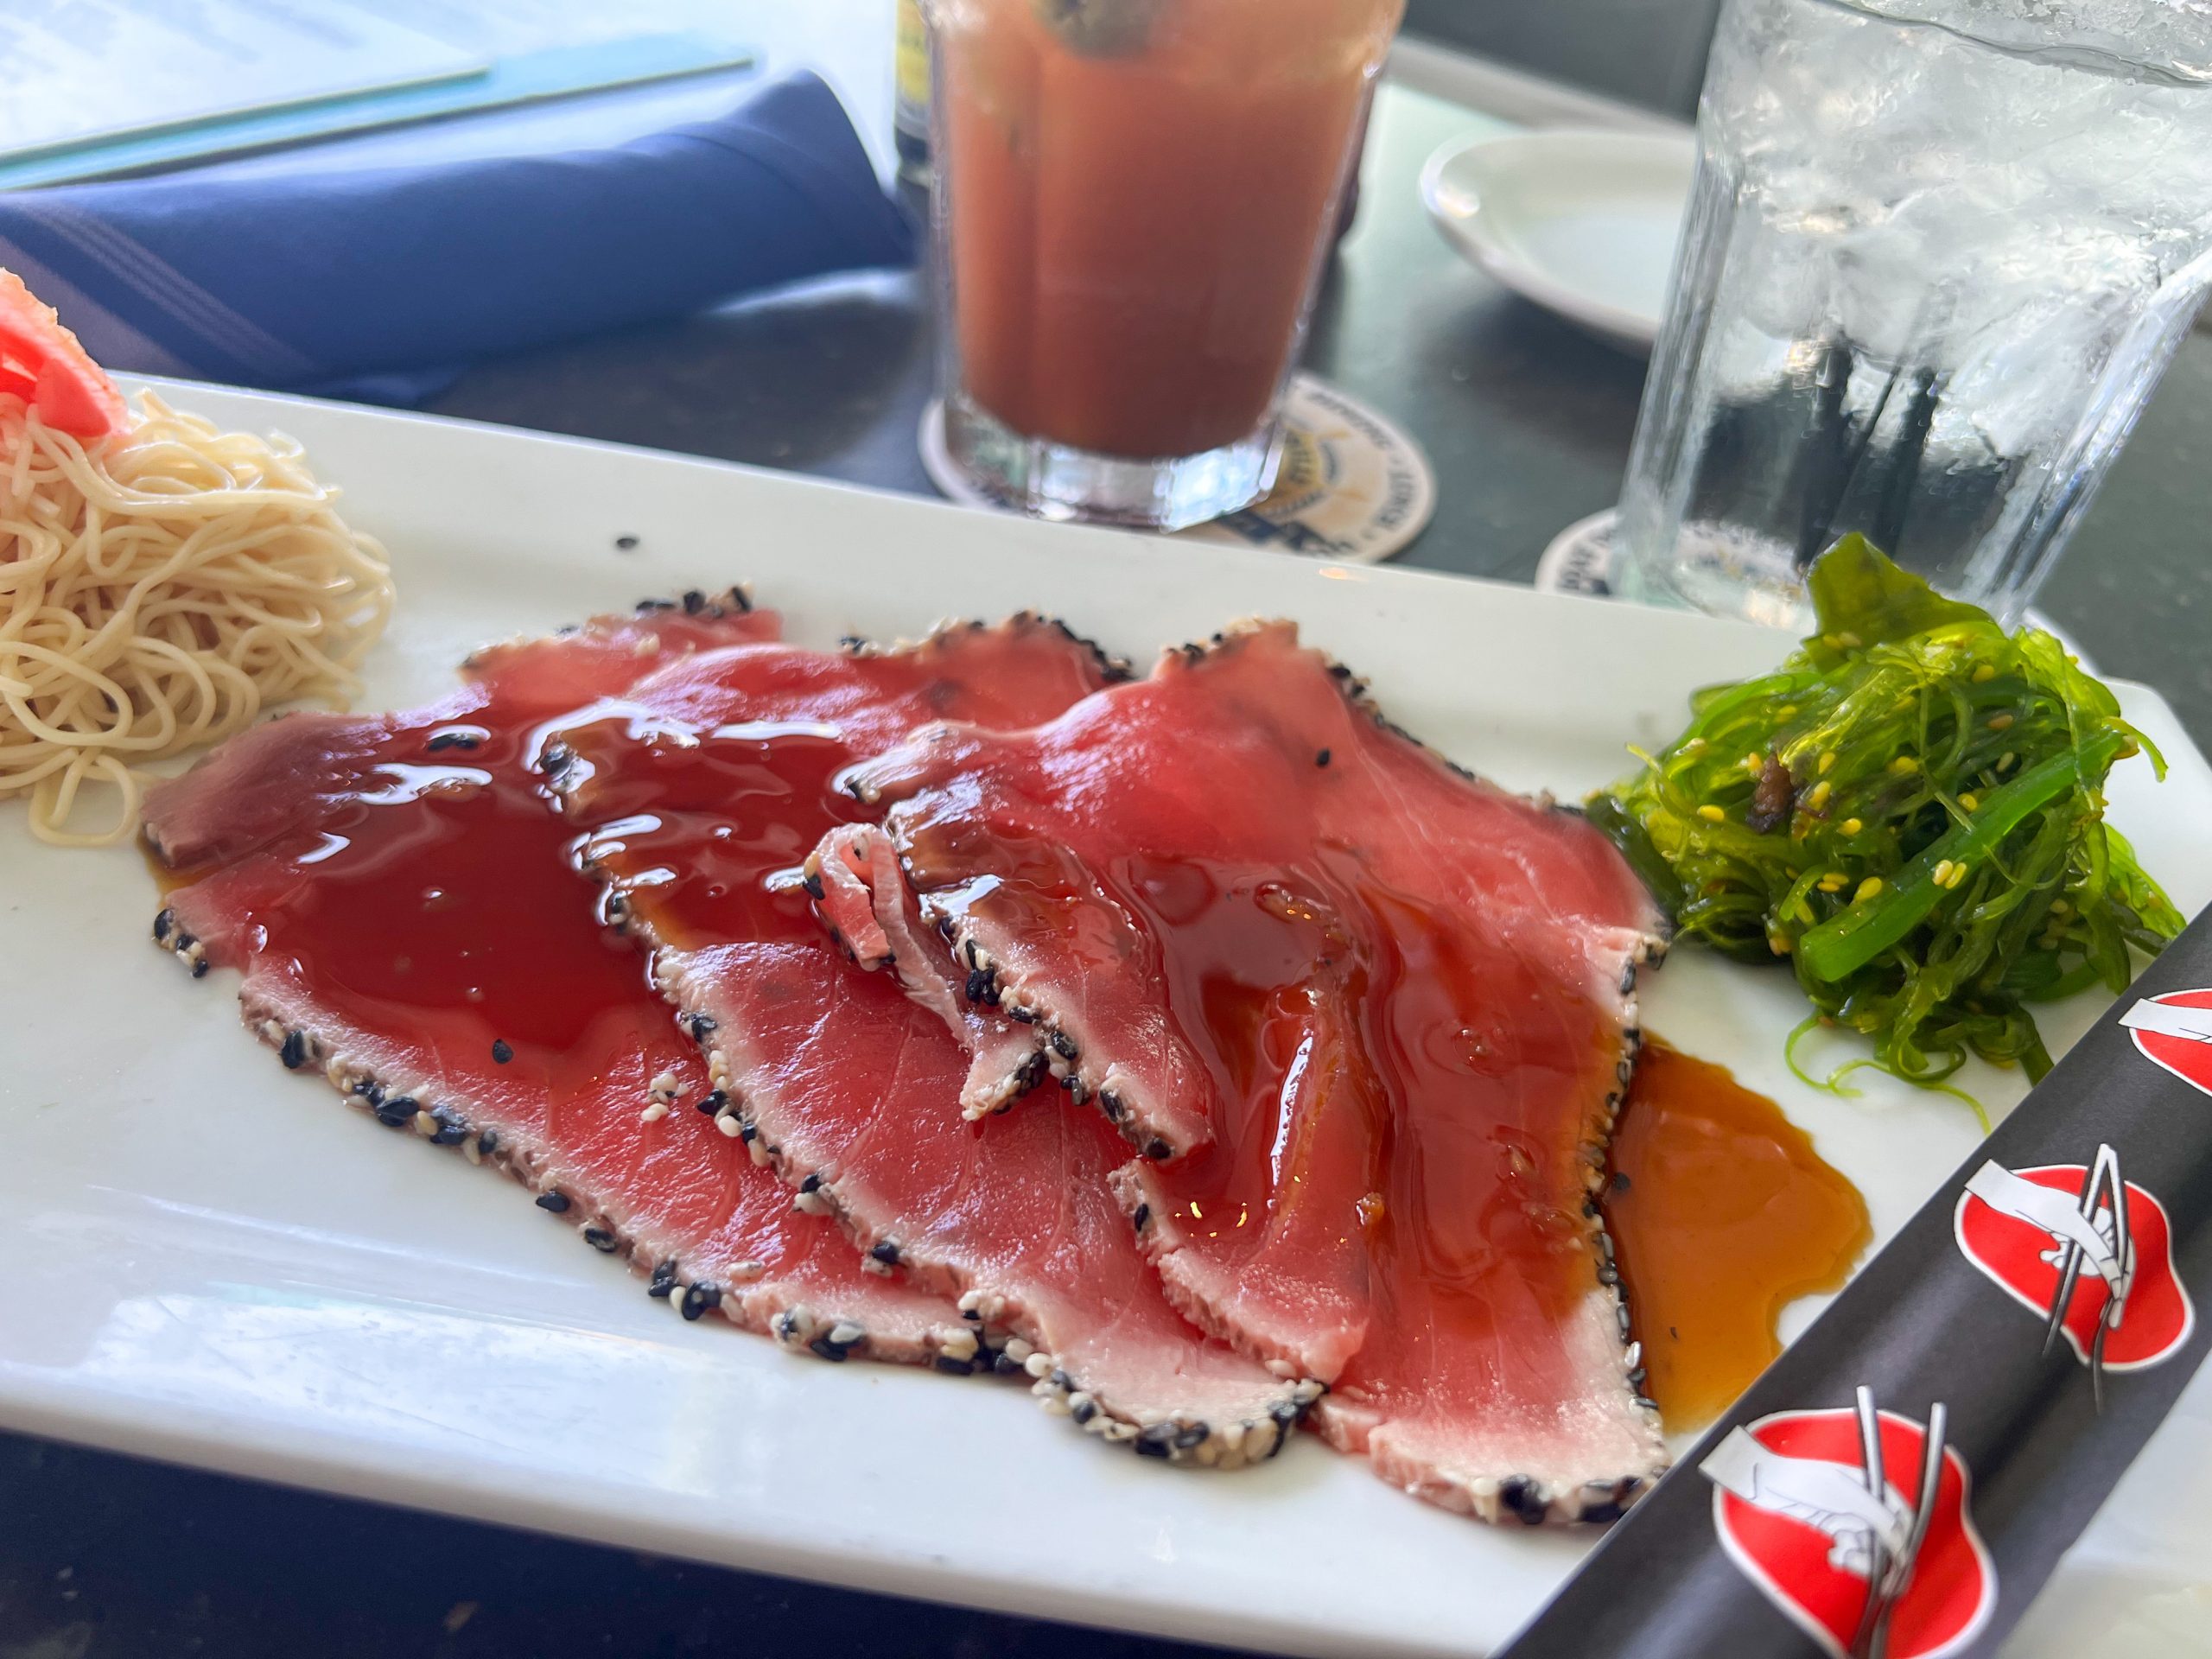
There is nothing else like Isu in the city of St. Petersburg. It has a completely unique and exceptional menu. The restaurant has been described as “Japanese-Fusion”, “Izakaya”, and “Nikkei”. One’s first reaction might be, “Well, which is it?” If you’re familiar with these three concepts and the differences, and then you work your way through the menu, you’ll realize that all three are correct. In brief, Japanese-Fusion means Japanese food mixed with any other type of cuisine. In this case, it would be the American-style sushi rolls with rice on the outside. (See the maki section of the menu.) Izakaya is a Japanese style of dining with small plates meant for sharing. Several items on Isu’s menu fit here too. Finally, Nikkei is Japanese-Peruvian cuisine that originated with Japanese immigrants in Peru. Both Japanese and Peruvian cuisines are seafood forward. One of the most obvious and frequent ingredients defining nikkei is the use of raw fish and ají. Ají is the word Peruvians use in place of chile, or chile pepper. Ají amarillo, or yellow chile pepper, is one of the most prominent used in Nikkei cuisine. Rocoto, a round red pepper, is another one. Isu is in the basement of Fortu with its entrance on Beach Drive. They both have the same ownership and management team. Lori and I had a visit to Isu with our friends Nick and Scott in December 2025, and then another visit in March 2026 with our friends Ronnie and Bobbi. For our December visit, every single bite of food was flawless, and we ordered a ton of food. We again ordered a huge amount of food in March, and only one item had an issue. There were two other items that were changed from the original versions where we liked the originals better. Aside from Sushi Sho Rexley, this is by far the highest quality sushi / sashimi in all of St. Pete. Many of the fish are flown in whole from Japan and broken down in house. Here’s a behind the scenes photo of a tuna being broken down in Isu’s kitchen. The menu is divided into four sections. Maki – sushi rolls with eight choices. Cold – five choices of raw seafood with other ingredients. Nigiri & Sashimi – raw seafood with or without sushi rice. Hot – cooked steak, seafood, dumplings, etc. MAKI Between our two visits some menu items changed, so we ordered them again. We thought most of the changes were for the better, but two were not. We preferred the original steak & egg maki over the new version, and hope they decide to change it back as it was a huge difference in how much better the original was. We would re-order the old one, but not the new one. However, the Bluefin Maki was outstanding as well as the Miso Salmon Maki. The Bluefin had buttery rich tuna with creamy avocado, sweet-savory miso onion, and a light crunch from the crispy quinoa. (Quinoa is quite popular in Peru with it being part of the region it comes from.) The Miso Salmon with savory glazed salmon, bright herbs, citrusy lime, and a creamy, umami-packed miso finish just melted in your mouth. COLD As we move to the Cold section of the menu we find the other changed item in which we preferred the original, which is the Akami Crudo. Technically, the two “crudo” dishes in a Nikkei restaurant should be called tiradito. So, Akami Crudo should really be Akami Tiradito. Ají amarillo sauce – bright in color and flavor – is one of the most popular sauces to use in this type of dish. We liked the original better as it had a much more flavorful pure ají amarillo sauce. The new version has a creamy ponzu added which takes it in a different direction than the traditional. It’s still a good dish though, and the new slicing on the fish is much more elegant. Also from the cold section, the Shima Rocoto with delicate, buttery striped jack with sweet heat from rocoto honey, earthy truffle depth, and a crisp quinoa crunch is an excellent choice. Our last item from the cold section was the Classic Ceviche. They nailed it, but they did change one thing that a Peruvian might not like, but this gringo appreciated. There are usually one or two large slices of sweet potato in a classic Peruvian ceviche, but in this case there were five or six medium diced (half inch cubes) of yellow sweet potato. I think this is a nice deviation from the traditional big clunky pieces of potato in a dish that otherwise has small elegant ingredients. (Potatoes are quite prominent in Peruvian cuisine as there are over 4,000 varieties grown there. They also have over 55 varieties of corn, two of which are in the ceviche – Choclo on the left and Cancha on the right in the photo below.) Peruvian ceviche is also its own thing – different than Mexican or Spanish – with some similarities to Ecuadorian. A defining characteristic of Peruvian ceviche is the Leche de Tigre, or “tiger’s milk” sauce / marinade. The dish is served with a spoon because you want to get every drop of the sauce. It has a citrus tang like other ceviches, but is much more complex containing white fish trimmings, fish broth, ginger, garlic, celery, cilantro, onion, ají, and finally – freshly squeezed lime juice. This is blended and strained for the final product. The Classic Ceviche is a must-order for a true taste of Peru. NIGIRI & SASHIMI The Nigiri & Sashimi section has 12 items to choose from with your choice of sushi rice (nigiri) or no rice (sashimi). Keep in mind that all of the fish are lightly brushed with different sauces that greatly, but subtly enhance their flavor, so soy sauce is not necessary or recommended. It is available if requested, but you shouldn’t. While I am not recommending adding soy sauce, […]
Pulpo Kitchen & Lounge is the latest brunch in St. Pete that you shouldn’t miss. My expectations were high since prior to Pulpo, I’ve experienced a lot of great food from the chef dynamic duo running this kitchen. Executive Chef / Owner Jason Ruhe (along with his wife, Hope Montgomery) have wowed St. Pete for years with their other two eateries. Brick & Mortar Kitchen + Wine Bar in downtown St. Pete, and Sea Worthy Fish + Bar in Tierra Verde. These two spots have been open ten and five years respectively. Also, Chef Jason Cline first impressed me with his food when The Birch & Vine opened in 2013. It was my favorite restaurant in St. Pete that year. He left there in 2016 to do other things, and now he’s back. So, two of my favorite chefs, both named Jason, exceeded my already high expectations with the brunch they created and executed. If you’re tired of the same old brunch and looking for something new and different, Pulpo has it. Their Latin-fusion with a focus on Cuban and Peruvian cuisine offers completely new takes on some of your favorite brunch items. Pulpo is located in the heart of the Grand Central District at 2147 Central Avenue. Approximately 120 seats are available inside with an additional 30 seats outside. There are bars both inside and outside as well. Brunch is on Saturday and Sunday 11:30 – 3:00. They actually open all seven days at 11:30. If you’re there on a different day at lunch I highly recommend the Cuban Dip – their take on a Cuban Sandwich. There is a brunch version as well. For more insight to Pulpo’s offerings, you can see our dinner review from January 2025 by Abby Allen-Leach here. Prosecco and a Bloody Mary are how we always start brunch. These were great, but the favorite was the Sandi-Rita with Corazon and Southbound Blanco Tequila, Ancho Reyes Verde, housemade serrano bitters, fresh watermelon, and lime. It’s a refreshing watermelon-lime tequila cocktail with layered green-chile heat and a clean agave snap. I could sip these all day. We started with two brunch specials. First up was the Breakfast Burger. I know I recently proclaimed that I had one of the best burgers of my life in a recent review, but I have to say it again. Pulpo’s Breakfast Burger has house ground steak, a crispy slab of pork belly immediately on top of the burger, fried egg, smoked cheese, crispy truffle potato, and hollandaise sauce. All of this comes on a fresh-baked, buttered and grilled focaccia bun. This burger is layered, rich, and luxurious where smoky, salty, buttery, and crispy elements all stack together in one decadent bite. It’s one of the two best burgers I’ve had in St. Pete all year. The other brunch special we had was the Duck Confit Benedict – poached eggs, duck confit hash, foie mousse, duck fat hollandaise sauce, and chorizo oil. This is another masterpiece of a dish packed with umami and bold flavors. The duck confit hash results in some pieces that are moist and juicy, and others that are delightfully crunchy. The warm runny egg yolks oozing down into the duck will give your salivary glands a workout. The foie mousse is a lush, creamy, velvety chef-genius-creation that makes for a flavor explosion in your mouth. It’s also a smart chef that comes up with duck fat hollandaise, and finishes the dish with the perfect contrast of chorizo oil. Sometimes I’m resistant to order paella because I’ve had too many with too much going on. I don’t need seven types of seafood in my rice. My eyes skipped over this on the menu because of my bias, and I am glad that Lori insisted on getting it. There is just the right amount of everything happening in Pulpo’s brunch paella – pork belly, shrimp, sofrito rice, 2 poached eggs, crispy pork belly, garlic shrimp, matcha aioli, herb salad, Fresno pepper, and hollandaise sauce. This paella hits all of the flavor notes and textures that make it a joy to eat. The shrimp pop, the pork belly’s crunch gives way to meltingly rich indulgent fat. The matcha aioli, frisée, red sorrel, and Fresno pepper offer bright notes to balance it out and the sofrito rice provides the perfect base for everything including the runny egg yolks and hollandaise seeping into it. Chef Ruhe grew up eating his mom’s ropa vieja. It’s a deeply ingrained part of who he is, and Pulpo’s is definitely one of the best ropa viejas in St. Pete. For brunch there are two ropa vieja dishes. The first is Ropa Vieja & Eggs – shredded slow braised brisket in tomato sauce, 2 fried eggs, sofrito rice, black beans, and plantains with toast points. Don’t miss the toast points. They have a perfectly crunchy crust and a chewy interior, and are flawlessly toasted and buttered. Dip them in the egg yolk for a delicious treat. The sofrito rice again provides the perfect base to bring all of the flavors together, and no Cuban-inspired dish would be complete without fried ripe plantains. These were just as they should be. The topping of frisée and watermelon radish provided the bright high note contrast to balance out the dish. We put the black beans on the side since they had cilantro, which tastes like soap to Lori. You can see them below the next photo. They were really excellent being herbaceous and tart with savory and umami notes at the same time. There’s also a great textural contrast of creamy pureed beans and tender whole beans that provide a soft bite with the creaminess. Birria tacos certainly had a moment that transformed them from a regional Mexican specialty into an international food trend, largely fueled by social media. However, they have moved beyond a trend to earn their permanent place on the menus of many restaurants, taquerias, and food trucks. Pulpo’s Birria Tacos employ their perfect ropa […]
If you’ve been in St. Pete for more than five minutes, then you know that this is a brunch-loving town. At this time, there is only one place where you can get brunch at a restaurant that is Michelin-recommended. Fortu is a Japanese-inspired eatery that opened in November 2023. They earned Michelin-recommended status in April 2025, and brunch started last month on October 18th. (For my dinner review from March 2025 along with dinner menus go here.) Fortu is located in a great spot one block off the water in downtown St. Pete at the corner of the two streets where all of the action is – Central Avenue and Beach Drive – specifically 97 Central Avenue. There’s great people watching in between bites of delectable comestibles. Brunch is on Saturday and Sunday from 11:00 – 2:00. A reservation is highly recommended as they have been selling out recently. We were the second table to arrive promptly at 11:00, and by the middle of service the place was packed. We started off with Bisol Jeio Prosecco Brut and the Kimchi Bloody Mary. I love Bloody Mary’s and usually have one or two on most weekends. If you love bloodies like I do, then Fortu’s Kimchi Bloody Mary is a must-try. It’s my new favorite. The idea is genius. The menu will tell you this: Oka Japanese Vodka, tomato juice, kimchi purée, assorted pickles … but there’s more to it. It also has kimchi hot sauce, soy sauce, wasabi, and six other ingredients that I have to keep secret. The Bisol Jeio Prosecco Brut was crisp and palate-cleansing with bright flavors that were quite pleasing. We ordered a couple of rounds of both. I saw the Shrimp & Lobster Dumplings on “the ‘Gram” a couple of weeks ago and I couldn’t stop thinking about them. They come with an aromatic ginger dashi, and are topped with shiso gremolata. They lived up to their promise of being dreamy little pillows of joy with just a slight pop, and then a buttery creamy filling that fulfills only like lobster and shrimp can. The ginger dashi broth offered up additional umami with the shiso gremolata balancing it out nicely with its herby minty pop of brightness. In case you don’t know, dashi is a Japanese soup stock that serves as the foundation for many Japanese dishes like miso soup, ramen, and noodle sauces. It is made primarily from dried kelp (kombu) and dried, smoked fish, such as bonito flakes (katsuobushi), which are soaked or briefly simmered in water to extract their savory umami flavor. Steak and eggs are an American brunch staple and Fortu pulls it off perfectly. Their version includes a petite prime filet, two eggs, crispy potatoes, and peppercorn jus. The steak is a perfect medium-rare, superbly seasoned and finished with a delightful jus. The eggs are over easy just as they should be, and brilliantly placed on top of the potatoes so the yolk can run right into them. The potatoes here are much more than a co-star in this tasty production. They deserve top billing too. The current rendition includes Red Thumb, Yellow New Fingerling, and Magic Molly Purple potatoes. These smashed potatoes are so good because they combine a creamy, fluffy interior and a crisp exterior. Smashing them also lets the butter get on the inside and outside for even more flavor and moisture. Watch for them on a couple of other dishes as well. Karaage Chicken is Japan’s version of fried chicken, and no brunch would be complete without some version of fried chicken. Fortu smartly uses chicken thighs, which is traditional in this dish, but I point it out as so many restaurants use chicken breast in so many dishes that would be better with thighs. For example, I have no idea why so many chicken curries have dry chunks of chicken breast. This karaage chicken is wonderfully crispy on the outside and moist, juicy, and delicious on the inside. It comes with seasoned sushi rice, Napa slaw, and sweet chili kewpie that reminds me of bang bang sauce. The pancake is a real sweet treat with a little bit of savoriness to balance it out. They’ve come up with a unique invention that is a cross between an American and a Japanese pancake. Japanese pancakes are known for being quite thick and fluffy – about 4″ in diameter and a whopping 2″ thick. American pancakes are usually 6″ in diameter and ¼” thick. Fortu’s pancake is about 10″ in diameter (taking up the whole plate) and about an inch thick in the middle. This is an excellent pancake. The batter is fermented for 24 hours. The umami maple syrup has just the right amount of stickiness for a great mouthfeel combined with the ultra-fluffy pancake. The syrup is mostly sweet, but balanced with savoriness, and just like the potatoes, the captivating combination of fluffy inside and crispy outside on the pancake keeps it interesting. I feel that the average pancake can be one-note boring. This one is a delicious blend of contrasting flavors and textures that finally delivers a pancake that I can be excited about. The culinary creativity doesn’t stop there. The “Tomago Sando” combines two famous Japanese eats to construct something completely new. Tamago is the Japanese word for egg. Tamagoyaki is the renowned Japanese rolled omelette. This omelette is often sliced to top egg sushi. (The photo below is for demonstration purposes only. Egg sushi is not served at Fortu.) Then there is the Japanese Egg Salad sandwich. Food writer Jason Diamond gushed about this sandwich, (specifically the Japanese 7-11 version) in the May 2022 issue of Food & Wine Magazine. One of the things that makes it special is the use of Kewpie mayonnaise. Standard mayo is made with whole eggs. Kewpie mayo only uses the egg yolks making for a much richer mayonnaise. Fortu brilliantly combines the idea of the Japanese omelette and egg salad sandwich into one. In this […]
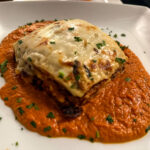
Situated just steps away from the sands of of St. Pete Beach, La Dolce Vita Trattoria offers a charming escape to Italy through their cuisine. The air within the restaurant smells of herbs, garlic and house-made sauces. The staff is warm, welcoming and passionate and the ambiance is cozy. You may already be familiar with La Dolce Vita’s restaurants in Palm Harbor and Clearwater, which opened prior to their spot on the beach. This location off of Gulf Blvd on St. Pete Beach has only been around for a handful of months now – they opened shortly after Easter earlier this year. The indoor space is divided into two sections – a more casual area is located in the front of the space with a small bar and then a larger main dining room is in the back. Additionally, there is a plentiful amount of covered outdoor dining on their patio which faces La Dolce Vita’s parking lot. Upon entering the restaurant on a Friday evening around 6:00PM, we were greeted by their very pleasant front of house staff. We arrived 15 minutes earlier than our reservation, however, they were able to seat us without issue. Our attentive server, Nicholas (who is from Italy), promptly greeted us at our table and we ordered an Aperol Spritz and a Peroni to kickstart the experience. At first glance, we were a bit overwhelmed with the menu because of the sheer quantity of dishes offered. For context, there are 24 total pastas offered. These, of course, are in addition to the many starters and meat and seafood plates. Thankfully, Nicholas was a great source of guidance. We explained our likes and dislikes to him and he guided us through our meal with ease. Complimentary bread with a red pepper and cherry tomato dipping sauce landed on the table with our beverages moments after they were ordered. We hummed over the sauce and slathered every bit of our bread in it. The Vongole and Tortellini in Brodo from the starter section were must-order dishes going into this meal, so, we started there. Clams, garlic, olive oil and white wine – simple, but lovely. I am a firm believer in the fact that when it comes to a delicious meal, quality ingredients trump quantity. This was a great place to start and the portion was hefty with approximately two dozen clams. Sopping up the sauce with bread is highly recommended. Tortellini in Brodo was a standout for us. My husband had never had it prior to this experience and, therefore, didn’t know what to expect. He was blown away by the comforting broth and pillowy soft meat tortellini with assists from olive oil and Parmesan. It was such a cozy treat. This dish is listed with the starters, but you could undoubtedly make a meal out of it. After our starters, we had to come up with a game plan for the rest of our meal with the help of Nicholas (Nico). We noted many different tables with lasagna, so we knew that that was a must-order. Carbonara and Chicken Parmesan with a side of Penne with Bolognese also made the cut. I also ordered a glass of Montepulciano to enjoy with the entrees. La Dolce Vita has a handful of wines by the glass as well as a number of wines by the bottle. Of the three mains, the lasagna was the favorite. The sauce had the color of a vodka sauce, but was actually a blend of their marinara and béchamel which gave it it’s off red hue. Typically, the sauces are layered during lasagna assembly. Combining the two together produced a rich and creamy product. Every bite of lasagna was tender and melted effortlessly in your mouth. When it comes to Chicken Parmesan, I tend to be quite particular. This might be a hot take, but I prefer my chicken Parmesan without mozzarella and that’s how I always make it. La Dolce Vita has both chicken and veal Parmesan on their menu and each is served with your choice of sautéed vegetables or a side of pasta. Nico informed us that if we opted for the pasta (which we did of course) we could upgrade to a bolognese sauce, so we did just that. To my surprise, I really enjoyed the chicken Parmesan as it was well executed and bursting with flavor. The side of Penne tossed in Bolognese was unlike any I have had before – slightly sweeter than expected, with a pronounced note of nutmeg. Having already selected two red-sauce entrees, we looked for a third option that offered a change of pace. While Carbonara isn’t typically my first pick, the inclusion of classic ingredients made it an appealing choice. Non traditional carbonara’s often include cream or milk, garlic, onion, herbs and even bacon instead of Guanciale. La Dolce Vita’s Carbonara is indulgent and luxuriously creamy with crisp bits of guanciale laced throughout with a peppery finish with each bite. When we were through with our entrees, our leftovers were boxed up and we then discussed the dessert menu with Nico. There are a number of desserts on the menu and they are all made in-house. Options include Panna Cotta, Cannoli, Tiramisu, Affogato and more. Just when I was almost sold on the Tiramisu, Nico shared that there was an off menu dessert special of the night – a pistachio cake. Because Nico spoke so highly of this special, we had to have it. Spoiler alert, it was divine. Silky and irresistibly smooth, this cake marries velvety creaminess with a punch of pistachio. If you’re ever at La Dolce Vita when this dessert is featured, I encourage you to end your meal with it. With delectable dishes and friendly service, La Dolce Vita Trattoria makes every meal feel special. If you’re in the mood for classic Italian on St. Pete Beach that delivers bold flavors certain to satisfy, this is your spot. Every dish at La Dolce Vita […]


..
ST. PETE FOODIES APPROVED SPONSOR:

Recipes
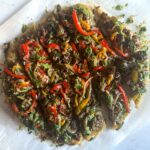
In this recipe, we are transforming simple ingredients into an elevated flatbread that is ideal for enjoying on these cooler December evenings. All of the elements involved in this sausage, pesto & peperonata flatbread are not only complementary together, but they are equally as delicious when used in different applications. The pesto can be tossed with your favorite pasta or served alongside arancini (we actually did this for Thanksgiving this year and it was a hit). Peperonata can serve as an easy appetizer spooned onto crusty slices of bread, or as a tangy topper for sandwiches, crispy cutlets or even with a steak. You can use any type of flatbread for this recipe. On a busy weeknight when time is of the essence, I suggest grabbing a flatbread option that is already baked in the package – naan could even work well here. Rollin’ Oats Natural Food Market sells a few different variations like O’Doughs flatbread, which happens to be gluten free and vegan. If you’d rather bake a homemade or store-bought dough and have the time, I recommend going for it. This way, you can control the thickness of your flatbread. The bake time is only about ten extra minutes, if you opt for this route. The ground Italian sausage brings the the whole flatbread together with its subtle touch of savory spice. Ground Italian sausage is my preference, but if you’d rather a fully-cooked version, you can’t go wrong. Simply slice it into rounds and arrange before baking the flatbread in the oven. Sausage, Pesto & Peperonata Flatbread Recipe In this recipe, sweet and sour peperonata, pesto and sausage are combined to create an elevated take on flatbread. You don't have to make your flatbread dough from scratch in order to get the most out of this recipe – there are plenty of suitable store-bought options available. Pesto5 cups basil (5 packed cups, fresh)3/4 cup parmesan cheese (finely grated)1/2 cup pine nuts3 garlic cloves (peeled and smashed)3/4 cup olive oil1 tsp salt (plus more, to taste)1 tbsp lemon juice (from 1/2 of a small lemon (optional))Peperonata3 bell peppers (about 3 cups, mix of colors of choice, thinly sliced)1/2 cup olive oil1/2 white onion (medium in size, sliced thin)4 garlic cloves (peeled, smashed and sliced very thin)5 sprigs fresh thyme2 1/2 tbsp red wine vinegarsalt (to taste)Flatbread Assembly1 flatbread (homemade or a mix like Bob's Redmill or an already prepared flatbread of choice (naan would work great too))1 lb cooked ground sausage1/2 cup parmesan cheese (grated )basil or parsley (chopped (optional)) PestoHeat your oven to 325F and spread your pine nuts on a parchment lined baking sheet. Toast for 6 minutes. Add pine nuts and all pesto recipe ingredients, except the oil, (including lemon, if using – this will add a touch of brightness) to a food processor or high powered blender. Blend or process on high while slowly streaming in the oil until the pesto is smooth. Add more salt as needed. Set pesto aside until you're ready to assemble the flatbread.PeperonataHeat oil in a large pot or dutch oven over medium heat. Add in peppers, onion, garlic and thyme and cook for 6 minutes. Reduce the heat to medium-low to cook the mixture slowly until peppers and onions soften, about 25 minutes. Discard thyme sprigs, stir in red wine vinegar and season with salt to taste. Set aside.Flatbread AssemblyHeat oven to 400F. If using a homemade or store bought dough, roll it out onto a parchment-lined baking sheet to your desired thickness. Top with a few spoon fulls of pesto (evenly dispersed), cooked ground sausage and half of the grated parmesan. Bake for 20 minutes. If using an already baked flatbread or other bread like naan, repeat steps with pesto, sausage and parmesan and bake for only 10 minutes.Remove flatbread from the oven and increase oven heat to 425F. Top flatbread with peperonata and remaining grated parmesan. Bake for another 6-8 minutes.Carefully remove the flatbread from the oven, drizzle with more pesto and garnish with chopped basil or parsley.Slice flatbread as desired and serve. Appetizer, Dinner, Main Course, Main DishAmerican, Cajun, ItalianSausage, Pesto & Peperonata Flatbread
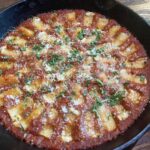
The temperature here in Florida may still be quite warm, but it is in fact fall and I can’t help but shift into comfort-cooking mode. For me, that means that lots of pasta dishes and comforting soups are frequently in the dinner rotation. A few months ago, I made stuffed rigatoni for the first time and fell in love with both the process of making it and the end result. The rigatoni was filled with a mixture of ricotta, mozzarella and provolone cheese and minced mortadella and was served in a spicy tomato sauce. While enjoying this dish, a number of alternative filling possibilities entered my mind and a simple mixture of ricotta and mushroom was one of the first. I’ve been making marinara at least once (sometimes twice) per month, usually on Sundays, for at least ten years now. Over the course of these ten years, tweaks and changes have been made to the recipe and a few years ago, I landed on what works best for my taste. The ingredient list is simple, but depends heavily on quality ingredients – like premium whole peeled tomatoes, 24 month parmigiano reggiono rinds and some good red wine. Luckily, Rollin’ Oats is a mecca for premium ingredients. For the sauce, they have a few canned tomato offerings that I recommend, like Cento and also organic variations from Muir Glen and Bionature. And we all know that they have a wonderful selection of great wines to choose from and a few experts on their staff to help you make a selection. You’re only using 1/4 cup in this recipe, but I always recommend using a wine that you would drink when cooking. You could undoubtedly assemble this recipe on a weekday, however, I think it is best enjoyed on a slow Saturday or Sunday. In the recipe, I suggest cooking the sauce for at least an hour, but you can definitely allow it to simmer for up to a few hours. The smell of marinara flowing through the home is one of my favorite scents ever. You can use this sauce in many other recipes like meatballs, chicken parmesan or other pastas of course like spaghetti. Ricotta & Mushroom Stuffed Rigatoni Recipe This comforting pasta dish is comprised of rigatoni that is stuffed with a mix of creamy ricotta cheese and savory mushrooms that is then baked in a simple marinara sauce. ovensafe skillet or large dutch ovenBlender Marinara1 tbsp olive oil1/2 white onion (medium in size, roughly chopped)3 garlic cloves (peeled and crushed)1 tsp dried oregano2 tbsp tomato paste1/4 cup red wine (pick a red that you would drink)2 bay leaves1 28oz can crushed or whole peeled tomatoesparmesan rind (optional)1 tsp salt (plus more to taste)Ricotta & Mushroom Filling1 tbsp olive oiltsp tsp salt (divided)8 oz mushrooms (diced into very small pieces – shiitake, baby bella, or most any other mushroom will work)10 oz ricotta cheese1 eggRigatoni & Assembly16 oz rigatoni (you may have leftover rigatoni – save them for another use)1 tbsp olive oil1/4 cup parmesan (grated)1/4 cup fresh basil (roughly chopped or torn) Ricotta & Mushroom FillingHeat 1 tbsp olive oil over medium heat. Add mushrooms and 1/2 tsp salt and cook, stirring occasionally, until liquid from mushrooms has evaporated completely – about 10-12 minutes.Add cooked mushrooms to a bowl with ricotta, beaten egg and remaining 1 tsp salt. Allow mixture to cool in the refrigerator while you prepare the marinara.After filling has cooled for an hour, add filling to a sandwich-sized ziplock bag. Cut a very small opening into one corner of the bag (smaller than the size of the opening of the rigatoni).MarinaraHeat a dutch oven or pot that is medium in size over medium heat. Add 1 tbsp olive oil and chopped onion. Cook onion, stirring occasionally, until it softens (6-8 minutes). Season with 1/2 tsp salt.Add in crushed garlic cloves and dried oregano and cook for one minute, stirring constantly, until fragrant – about one minute. Stir in tomato paste and cook until it takes on a brick red color. Pour in wine, deglaze pan, and allow the wine to reduce for 2-3 minutes. Add bay leaves, tomatoes, parmesan rinds (if using) and another 1/2 tsp salt to the pot and stir to combine.Bring marinara to a simmer, reduce heat to medium low, and allow sauce to simmer gently for about one hour. Season with more salt as needed. After an hour, discard bay leaves and parmesan rinds and blend sauce with an immersion blender or in a high powered blender until smooth. Add sauce to a large oven-safe skillet (like cast iron) or a large dutch oven and set aside until ready to fill rigatoni.Rigatoni & AssemblyHeat oven to 350 F. Cook pasta 1-2 minutes less than package instructions (you want an al dente texture to keep the rigatoni from ripping – they will cook further in the final steps of the recipe in the oven). Strain and rinse with cold water, add to a large bowl and toss with 1 tbsp olive oil to keep the rigatoni from sticking together.One at a time, pipe filling mixture into each piece of rigatoni and arrange in a single layer in prepared skillet/dutch oven with pureed marinara until you run out of room (you want to nestle them into the sauce so they are mostly covered).Repeat with remaining pieces of rigatoni. Distribute half of grated parmesan over the stuffed rigatoni in marinara.Place skillet into the oven until cheese melts and begins to take on a light golden color- 20-25 minutes. Top with remaining grated parmesan and basil and serve immediately. Dinner, Main Course, Main DishAmerican, ItalianRicotta & Mushroom Stuffed Rigatoni
Elevate your appetizer game with these beef kofta skewers that are laced with irresistible spices and baked to juicy perfection. A drizzle of zesty toum sauce adds a garlicky kick, while a cucumber and tomato salad brings a refreshing crunch that complements the meat beautifully. Serve this all with some warm naan bread to round out the dish. Kofta is a popular Middle Eastern dish that is typically made from ground beef, lamb or chicken that is mixed with spices, herbs and often garlic and onion. The mixture is then formed onto skewers and usually grilled or sometimes baked. Kofta is often served with rice, flatbreads, vibrant salads and a sauce like tahini or toum. There are many different variations and it is a beloved dish across many different cultures. I like to serve kofta as an appetizer for a group and often as an entree for my husband and I. My sauce of preference with kofta is usually a homemade toum sauce. Toum sauce is a recent discovery of mine that I had while dining with friends and after one taste, I knew that I loved it and needed to recreate it. It’s a creamy and flavor-packed condiment that is made from a few simple ingredients – a head of garlic, neutral oil, lemon juice and salt. The mixture is formed in a food processor until a creamy sauce forms (similar to the consistency of yogurt). We use ground beef in this kofta variation – a very high quality organic and grass-fed ground beef that can be found at Rollin’ Oats. They have a few different options, but I prefer the Simply Balanced 90/10 selection. Quality is always of the utmost importance to me when it comes to sourcing any ingredient that I use and I can always trust Rollin’ Oats to have the absolute best. Beef Kofta with Toum Sauce Recipe Savor the spiced flavors of juicy beef kofta paired with a garlicky, creamy toum sauce that elevates this Middle Eastern dish to a whole new level. skewers Beef Kofta1 lb ground beef1/4 cup white onion (minced)2 tsp garlic (minced)1/4 cup parsley and mint (finely chopped)1 tbsp olive oil2 tsp all spice2 tsp paprika1 tsp cumin1 tsp coriander 1 tsp salt1/2 tsp cinnamon1/2 tsp black pepperToum Sauce1 cup garlic cloves (peeled)3 cups neutral oil (grape seed, sunflower, vegetable or canola)1/2 cup lemon juice2 tsps Kosher saltCucumber & Tomato Salad1 tomato (ripe, medium in size & diced)1/2 cup cucumber (diced)1/4 cup basil (finely chopped)1/2 tsp salt (plus more to taste)To Servenaan breadlemon wedges Toum SauceSlice the garlic cloves in half lengthwise and remove any green sprouts. Transfer the sliced garlic cloves into a food processor and add the kosher salt to the garlic cloves. Process for a minute until the garlic becomes finely minced. Make sure to scrape down the sides of the food processor afterwards. While the food processor is running, slowly pour one to two tablespoons of oil, then stop and scrape down the bowl. Continue adding another tablespoon or two until the garlic starts looking creamy.Once the garlic looks emulsified by the few tablespoons of oil, increase the speed of pouring the oil and alternate with the ½ cup of lemon juice until all the oil and lemon juice is incorporated. This will take about 15 minutes to complete.Transfer the sauce into a glass container and cover with a paper towel in the fridge overnight. Makes about 4 cups. The next day, replace the paper towel with an airtight lid and keep in the fridge for up to 3 months.Cucumber & Tomato SaladCombine all ingredients in a bowl, season with salt and refrigerate until the kofta is finished.KoftaIf you're using wooden skewers, soak them in water for at least 20 minutes. This will prevent burning. Combine all kofta ingredients in a medium-sized bowl with your hands until everything is mixed well. Refrigerate the mixture for 30 minutes. Heat the oven to 450F. Place a wire rack onto a baking sheet and brush it with olive oil. After the mixture has been in the refrigerator for at least 30 minutes, divide it into four even-sized portions. Form each portion into a snake-like shape around each skewer.Bake the kofta for 13-15 minutes or until the beef is cooked through and beginning to brown on top.To ServeServe kofta on a platter with naan, cucumber and tomato salad, toum and lemon wedges. Appetizer, Dinner, Main DishMiddle EasternKofta, Toum Sauce, Baked Kofta
Low effort and high reward is the name of the game with this take on slow-roasted salmon. The slow-roasting process ensures tender and flakey salmon that melts in your mouth with each bite. The addition of citrus makes this dish quite refreshing while the chili crunch sprinkles in bold and spicy notes. Though the ingredients involved are minimal, together they are the utmost well-balanced. There isn’t a ton of produce in season right now in Florida, but citrus, including orange varietals and grapefruit are goods that you’ll find plenty of during this time of year. Marrying together the invigorating flavors in citrus with a high-quality, fatty piece of wild salmon is quite lovely. The chili crunch aids in adding some texture and the torn fresh dill (or basil) rounds out the dish. Avocado, which is also in season in September, pairs well with all of these ingredients too. If you’d like to also incorporate that, use 1/2 of a ripe avocado and slice it into thin pieces. You can certainly go the extra mile by making your own variation of chili crunch or chili crisp (trust me, it’s much easier than you may think!), but there are plenty of solid options on grocery store shelves these days. One of my favorites is from Momofuku and you can find this at Rollin’ Oats (it’s actually on sale currently). They offer a regular chili crunch, spicy and also a hot honey version. Another reputable brand at Rollin’ Oats is by Mr. Bing – they have a mild and spicy option. When it comes to selecting your salmon, I always suggest reaching for the wild caught versus the farm raised. Rollin’ Oats doesn’t have a dedicated seafood counter; however, they offer quality frozen wild caught salmon that works great for this dish. Just make sure to safely thaw the salmon prior to roasting it. Slow Roasted Salmon with Citrus & Spicy Chili Crunch Recipe Discover a new favorite low-effort dinner with this slow-roasted salmon which is paired with vibrant bits of citrus and a spicy assist from chili crunch. 16 ounces salmon (skin on and preferably wild-caught – 1 large piece or two 8 ounce pieces are recommended)1 tsp olive oil1/2 lemon (sliced into thin rounds)1 grapefruit (peel and pith removed and cut into thin rounds and then into halves and quarters)1 orange (peel and pith removed and cut into thin rounds and then into halves and quarters)1/2 tsp salt (plus more, to taste)2 tbsp chili crunch (plus more as needed – choose your favorite brand – I love Momofoku which can be found at Rollin' Oats)dill or basil (fresh & torn into smaller pieces (garnish, optional))avocado (sliced (optional)) Heat oven to 250F. Line a baking sheet with parchment paper. Place the salmon on the lined baking sheet brush with olive oil, season with salt and top with the lemon slices.Roast the salmon for an hour and remove from the oven – the salmon should be quite tender and should pull easily away from the salmon's skin in pieces. Don't worry about keeping the salmon filet in one piece – we want it to flake a bit into chunks.To plate, arrange the flaky salmon pieces with citrus and avocado (if using) on a serving platter – there is no right or wrong way to do this, so feel free to get creative with your plating. Top with 2-3 spoon-fulls of chili crunch and garnish with torn dill or basil. Season with more salt as desired. Dinner, Main Course, Main DishAmericanSlow Roasted Salmon, Slow Roasted Salmon with Citrus & Chili Crunch
Fresh Corn Polenta with Pickled Shrimp brings together the sweetness of summer corn and the tangy notes of pickled shrimp. This recipe offers a brighter twist on traditional comfort food. This take on polenta acts as an idyllic canvas for the zesty shrimp which are pickled and marinated in a myriad of ingredients which include, but are not limited to: rice wine vinegar, citrus, crushed red pepper flakes and garlic. It’s a perfect dish for highlighting popular ingredients that are used a lot in summer cooking. Creating the fresh corn polenta could not be more simple and only requires a few ingredients that you probably already have on hand. I first made this polenta a couple of weeks ago after I picked up some corn from a farmer’s market in the area. I was told that the corn had just been harvested the day prior from a farm here in Florida. The method for making the fresh corn polenta was something that I had been wanting to experiment with. It all starts by peeling the corn and then grating it with the large holes on a boxed grater. From there, the grated corn mixture is then simmered with a couple of pats of butter and some salt until the polenta thickens a bit. This process only takes about ten minutes. The polenta is then finished with a squeeze of fresh lime. Initially, I had planned to top the fresh corn polenta with poached lobster and some chive butter (which I will be trying soon), but then I found some inspiration for pickled shrimp from a recent episode of a food-related show on television (The Lost Kitchen, for those interested). The shrimp are first poached in some water, lemon and salt. Then, they are placed in a pickling mixture in the refrigerator for a few hours (and up to 24 hours). The pickling mixture makes for tangy and flavorful shrimp that not only work well on this polenta, but also with many other things. These shrimp would work well on some toasty sourdough, tossed in a salad, nestled in some rice or simply on their own as an easy appetizer. For the shrimp, I always strive to use wild caught, but use whatever you can find. Rollin’ Oats has great quality frozen shrimp by Baywinds and Wixter Seafood. Simply thaw the shrimp and devein them with the shells on if they aren’t already deveined (this is easier to do than you think – use a wooden skewer or toothpick, poke it through the side of the shrimp in the middle towards the top and slowly thread and pull the vein out – give it a google for a tutorial). You can also use shrimp that are already peeled and deveined too, but cooking the shrimp with their shell on adds to the flavor and prevents overcooking of the shrimp. Fresh Corn Polenta with Pickled Shrimp Recipe Put summer's fresh corn to good use with this fresh corn polenta recipe. The pickled shrimp add a zesty zing when served atop the creamy polenta. glass bowl or glass Tupperware Poaching the Shrimp12 shrimp (medium to large in size – shell on, but deveined (optional, you can use peeled shrimp if you prefer))6 cups water6 cups ice1 lemon (cut in half)2 1/2 tbsp saltPickling the Shrimp3/4 cup rice wine vinegar2 tbsp sugar2 garlic cloves (peeled and smashed)1/2 tsp crushed red pepper1 dried bay leaf1/2 cup olive oilt tsp worcestershire 1 tsp salt1/2 tsp hot sauce (use your preference – I usually opt for Diamond Crystal)1/2 lemon (sliced into small wedges)1/4 cup red onion (sliced thin)Fresh Corn Polenta4 ears corn (husk and silk removed)2 tbsp butter1/2 tsp salt (plus more to taste)1/2 limeDish Assemblymicro-greens (for garnish – fresh dill would work well too (optional)) Pickling the ShrimpAdd vinegar, sugar, garlic, crushed red pepper and bay leaf to a microwave-safe bowl or glass measuring cup. Heat mixture for two minutes, stir to combine and cool completely in the refrigerator (30 minutes to an hour).When mixture is cool, stir in olive oil, worcestershire, hot sauce and salt. Then, mix in lemon wedges and sliced onions. Set aside until poached shrimp are ready.Poaching the ShrimpAdd water, juice lemon and lemon halves and salt to a medium pot and bring to a boil.Add deveined shrimp, remove pot from heat and allow shrimp to poach for 5 minutes (or until they turn pink).Add in ice and allow to sit for another 10 minutes.Remove shrimp from pot and discard water and lemon. Peel shrimp (leave tails on if desired, optional) and place into glass bowl or Tupperware for pickling.Pour prepared pickling mixture over the shrimp. Cover shrimp and place in the refrigerator for at least three hours and up to 24 hours.Fresh Corn PolentaGrate corn on the cob with the large holes of a box grater over a medium-size bowl.Heat grated corn, butter and salt over medium heat. Cook, stirring occasionally, until corn mixture thickens – about ten minutes. Taste and season with more salt as needed (polenta should now taste a bit more rich). Remove from heat and stir in juice of 1/2 lime.AssemblyTo plate, add 1/4 corn polenta mixture to each bowl, top with pickled shrimp and garnish with micro-greens or fresh dill. Appetizer, Dinner, Main DishAmericanFresh Corn Polenta, Pickled Shrimp


..
ST. PETE FOODIES APPROVED SPONSOR:

..
ST. PETE FOODIES APPROVED SPONSOR: